The Timeline editor
The timeline editor has two separate modes.
In both modes, there are toolbars available on the top of the window. The first toobar is pretty simple, it contains the classical undo and redo buttons, along with two buttons that select the curve editor mode, worksheet or curves.
Worksheet mode
The first and default mode is the Worksheet mode. In this mode you see the all the keyframes, the actuator keyframes, along with actuator group pseudo-keyframes.
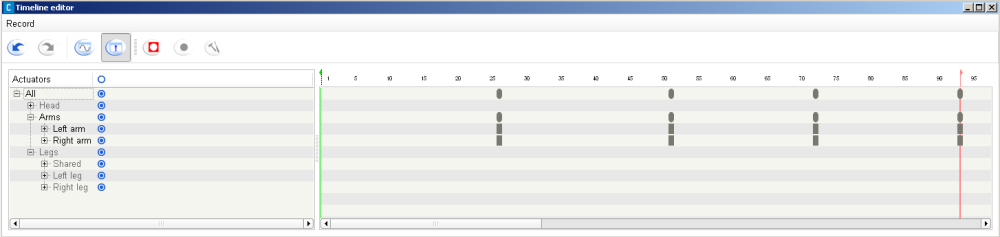
The left part of the window show a tree of the actuators present on the robot. The actuators currently include all motors, and are grouped along limbs of the robot.
Each leaf of the tree is an actuator, and all other nodes are groups of actuators. Besides the name of the actuator or group, there are several columns indicating flags that can be set on actuators. All flags actually only apply to actuator themselves, the leaves. On the group lines, you can see a summary of the state of the sub nodes, in a three-state fashion. If the flag is set on the group, it's set on all its children. If it's clear on a group, it's clear on all children. If children don't all have the same state, the group icon is in an intermediate state, grayed. Clicking on a leaf flag swaps its state. Clicking on a group flag check the flag on all children, except if it was already set on all children in which case it clears it.
On the right part of the window is the Worksheet itself. It's a grid, with each line corresponding to a node of the actuator tree, and each column corresponding to a frame index. The lines are aligned with the actuator tree entries, and therefore if an actuator node is hidden in the tree, it's worksheet line is hidden too.
In the worksheet, there are elements called keyframes. Each keyframe corresponds to a value stored in an actuator. Rectangle keyframes correspond to leaves in the currently visible actuator tree (ie. if a branch is closed, it is considered a leaf in that respect). Rounded keyframes correspond to open groups in the tree. When selected, keyframes turn from grey to orange. Group keyframes can have an intermediate greyish orange color, when only a part of their child keyframes is selected. Selecting a rounded keyframe will select all its children.
In the worksheet view, you can select, move, copy and paste keyframes. Since the value of each keyframe is not displayed, only the time index of each keyframe is controlled in that mode, and its primary use is to synchronize different parts of a movement.
Curves mode
The second mode is the Curves mode. In this mode you see only the actuator keyframes, but you also see their value along the vertical axis.
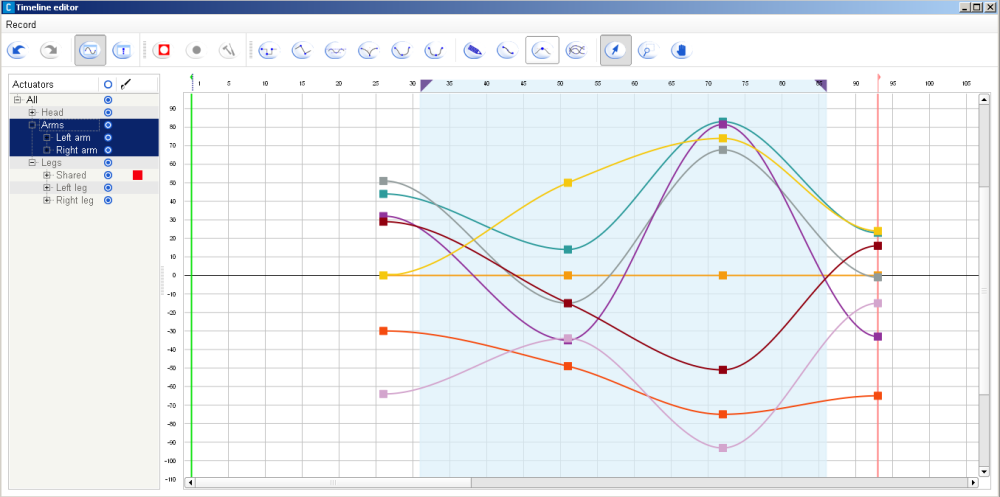
The curve editor in curves mode is also split in two parts. On the left, you will find the same actuator tree than in the worksheet mode. On the right however, a different view of the keyframes is presented, in the form of curves. The actuator tree is identical to the worksheet mode, with one major difference. You can select one or more nodes in the tree, and only these nodes will be displayed in the curve panel.
The right section of the curve editor contains the motion curves of the selected actuators. It should be noted that only end actuators are represented, not group nodes, since that makes no sense in such a view (groups of keyframes don't have intrinsic values). On the top of the view, there is a timeline similar to the timeline of the main Choregraphe window. On the left, there is a similar but vertical scale, indicating the value of the keys (ie. the motor angle for motor actuators).
In that curve view, you can select, move, copy and paste keys. Moving keys horizontally change their time index, while moving them vertically change their value. Keys are linked with curves. The parameters of these curves can be adjusted in each key. A series of buttons in the toolbar appearing in curves mode let the user change the type of curve used to link keys.
After the tangent type buttons, several more general buttons are available in the curve mode toolbar. The first is an edit button, which opens a window that contains the parameters of the current key. It is disabled if zero or more than one key is selected. If only one key is selected, it shows the current value and tangent parameter of the key.
-
 Constant: the value of the key is applied to the actuator up to the next keyframe. This won't give smooth movements on the robot, but it can be used to implement "robotic movement" effects.
 -
 Linear: the value is interpolated linearly toward the next key.
 -
 Automatic bezier: a Bezier curve interpolation is used, but the curve parameters are computed automatically by Choregraphe to give smooth and good looking movements. This is the default mode for new keyframes. In that mode, contrary to all other Bezier mode, the tangents of the curve at the key are not displayed by default. They can be shown by checking the "Show tangents" button (described below). Automatic tangents, when visible, are not editable, and are displayed in blue rather than black to distinguish them easily.
 -
 Bezier: this mode (and the following two) also implement a bezier interpolation, but here the curve parameters are now adjustable by the user. Two tangent handles will appear next to the key to control the curve slope.
 -
 Smooth: this is a Bezier mode too, but with an additional constraint, the two tangents of the key (on the left and on the right) must be aligned. Note however that if a key is only smooth on one of its side, the constraint won't be enforced.
 -
 Symmetrical: this is similar to the Smooth mode, with another constraint: the length of the two key tangents have relative sizes, so moving one not only keep the other aligned but also moves it horizontally to have an even smoother movement. Like the Smooth mode, the symmetry constraint will only be applied if both tangents are flagged symmetrical.
The  button is a simplification tool. It will reduce the number of keyframes in the curves while still keeping a similar motion.
The  button is checkable. When checked, the automatic tangents of the curve, which are not editable, will be displayed in the curve view. It is useful to mix automatic keyframes with manually adjusted ones.
The  button will reset the curve view so that all the selected curves are visible and fit the screen properly.
The last three buttons dictate what the mouse actions will do. It can be in one of three modes.
-
 is the key selection mode. Drawing a rectangle with a left mouse click will select a group of keys.
 -
 is the zoom area selection mode. Drawing a rectangle with a left mouse click will zoom the view so that it fits that rectangle.
 -
 is the viewport drag mode. In that mode, the mouse cursor becomes a hand, and dragging it while pressing the left mouse button will scroll the view.