Creating a box script from scratch using parameters
Introduction
In Choregraphe, it is possible to write your own box, defining their complete workings.
- We have already seen how a script works in the Simple modifications of a box script tutorial. As explained above, the first two steps are automatic, the user has no control over it from script. The second step is done from the links the user has created. But, you have full control over the third step which executes some part of the code you have written in the script. When writing script, you must remember that you are defining methods of a module class. Attributes, subscribing on ALMemory events... the possibilities are wide open.
- Once the box is initialized, the box is ready to be loaded. Whenever the box is loaded and an input is stimulated, a method is called in your script: . This is how you decide what to do when an input is stimulated.
- When writing script, you can decide at any time to stimulate an output. The method name that is called is .
How does it work?
For instance:
- If you have an onStopped output that is of "bang" type, calling onStopped() should do the job;
- If you have a faceDetected(string) output, you can call faceDetected("Robert") to warn that Robert has been detected.
In Python, the generated script of a new box would look like this:
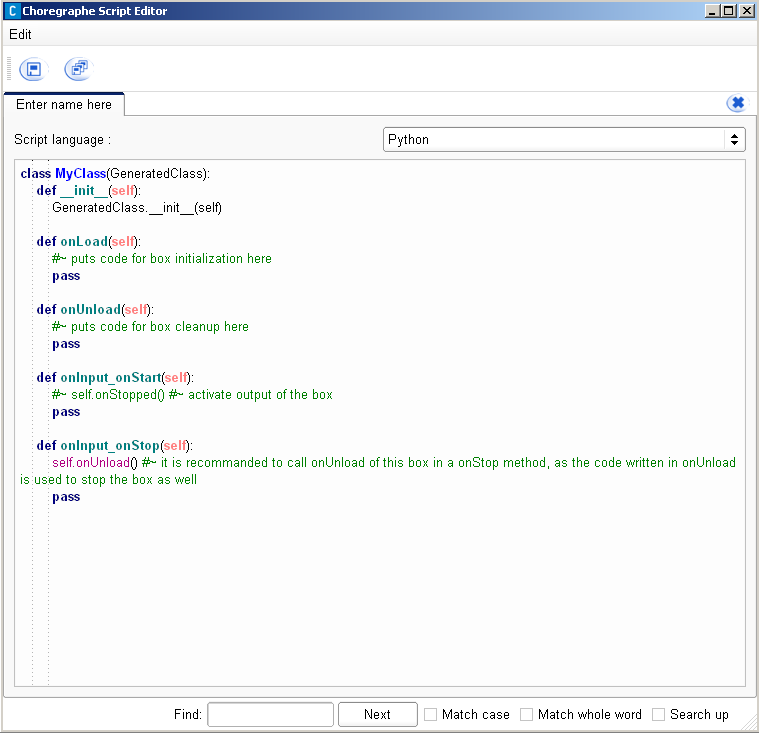
- Beyond the , you have one method associated with each of the box inputs.
- The first 3 lines are completely mandatory, and modifying then will lead to strange behavior. What you should modify is the content of the initialize method.
> you can initialize attributes (such as variables, or proxies to other modules).
> you should do everything that you only want to do once, because this box will not be destroyed before the end of this behavior.
- You will see an "onLoad" method. This is called whenever the box is loaded, which can be caused by one of the three following events:
Note: This method is called when the box is loaded, so it is strongly advised to avoid heavy code here. Meaning that if a box loading takes too long, the whole behavior will be slowed down. If you are in a timeline, you may even lose real-time.
> The behavior is started and the box is at the root level.
> The box is contained in a behavior keyframe that is being loaded.
> The box is contained in another box (meaning the latter box has a "flow diagram" offspring), and we stimulated an input of nature "onStart" on the parent box.
- You can also see an . This is called whenever the box is unloaded, which can be caused by one of the two events:
> The behavior is stopped.
> The box is contained in a behavior keyframe, and another keyframe of the same layer is being loaded (as the keyframe parent of the current box needs to be unloaded).
> The box is contained in another box (meaning the latter box has a "flow diagram" offspring), and we stimulated an input of nature "onStop" on the parent box.
Note: This allows you to warn other modules that your box is about to be unloaded and can therefore be very useful. For now you can probably forget about it, you will not need to use this function for simple boxes.
- And what about the ? Well the possibilities are unlimited. You are running in separate threads, so take your time, do heavy calculation, it should not affect the playing behavior... Remember that your output(s) will not be stimulated unless you explicitly do so. Meaning you write "onStopped" somewhere in your code. So if you use several script boxes that you have written, and you do not understand why the signal never comes out one of your box, the cause should not be hard to find: you forgot to call the output once your processing is done! Yes it is painful, but this way you can really decide when you want it to be stimulated, which allows you to do powerful things (and also use several outputs as you wish).
Example
- You find the LEDs of your robot very nice, but you would like to switch them on. Unfortunately, the Choregraphe interface that will allow you to do that (as simple as for the movements) do not exist yet. So you are stuck with the script... Well, what should you do? First, read the ALLeds documentation: this is the module that allows the user to turn on/off the LEDs. If you read the documentation, you should find that the methods are quite simple. For instance, turning the left feet LEDs requires the following command: setIntensity("LeftFootLeds", r) with r between 0 and 1.
So, what about running a little script to increase and decrease intensity over time, with self.step = 0.02 for instance. A classic Python script would look like this:
                r = 0
                while (r+ self.step < 1):
                  r = r +self.step
                  ALLeds.setIntensity ("LeftFootLeds", r)
                  time.sleep(0.01)

                while (r - self.step > 0):
                  r = r - self.step
                  ALLeds.setIntensity ("LeftFootLeds", r)
                  time.sleep(0.01)
- Now, create a new box called "RightEarLeds".
- Right click on the diagram panel and click on .
- Enter "RightEarLeds" as the name and "Increase and decrease RightEarLeds intensity over time" as the tooltip description.
- Edit an image to illustrate your box. You can choose a standard image (in Choregraphe's folder) or you can create an image.
- Click on .
Note: Three standard entries to your box are automatically created: onStart input, onStop input and onStopped output. You can modify these entries and create new ones by editing the box.
- Double-click on the box to edit its script box.
> The almost empty script box is displayed.
- Write the script to increase and decrease intensity over time.
> The "RightEarLeds" script should look like this:
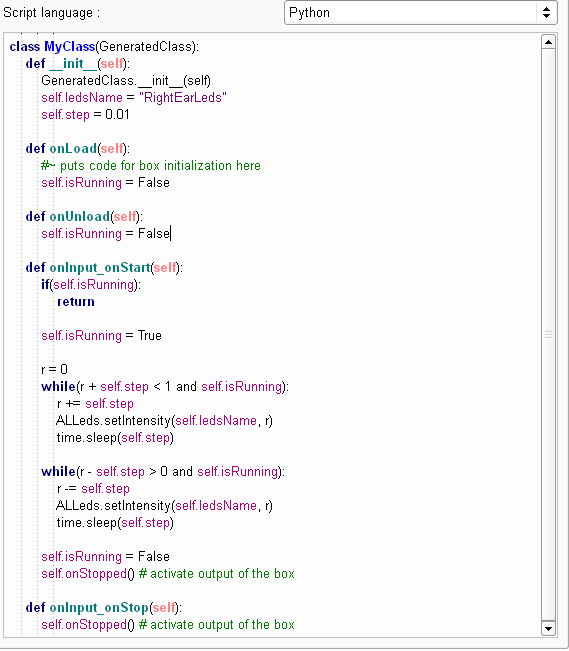
Note: Note the code that we had to put in onUnload to make sure the box exits its loop if we call onStop or if the flow diagram is unloaded.
Using parameters
Parameters allow you to customize the way the box works. After having created the parameters of the box, you will not have to edit a single line of script to use it.
To create the parameters of the box:
- Right click on the box and select the option.
- First, we want to be able to change the group of Leds we are working on, the left or right ear leds for instance. To do so, add a new parameter by clicking on the "+" icon, on the right side of the parameters list which should be empty.
- Its name can be "Leds name" for instance. A quick tooltip to explain what it is going to do would be good. The parameter we want to add is a "string", so select the 'String' option in the field.
- In the area, you can just enter "RightEarLeds" as a default value but it would not be very nice, as you have actually various other possibilities. It is better to enter several choices in the field. To do so, click on the "+" icon then enter "RightEarLeds". Click on OK then click again on the "+" icon to add the "LeftEarLEds" option for instance.
- As we cannot enter all the possibilities (there are too many), we can also check the "Custom string possible" option, which will allow you to enter manually another group directly from the box, without entering again on its properties.
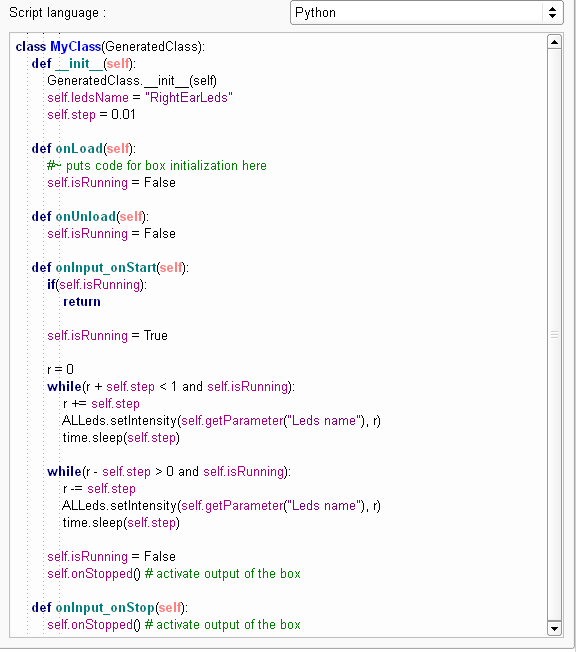
- Now, the only thing to do is to enter the script. To do so, right click on the bow then select the option.
- Remove the reference, and replace it with an access to a parameter. To do so, select the reference then right click on it to select . It should write the following script:
> self.getParameter("Leds name")
- The script should look like this at the end:
- Now, you just have to on the wrench of the box to change the side of ear leds that will fade over time. As you can see, creating a box from scratch is not too complicated!