Manuals
Here I put copies of the several manuals. At least I find online manuals much more convenient than browsing through piles of paper.
I dont think the manufacturers
will have problems with this, but I will remove these manuals as soon as they complain.
Frame
manuals for Raptor 30 and 50, now in high-quality pdf version
and yet smaller than the various low-resolution versions on the web.
Info about the main rotor blades
Info about the tail rotor blades
swash plate cross-section and explanation
Just for fun: download the unique Raptor clutch bell here! (Nice as computer alert sound)? Also in .wav format. Sorry for the clipping in the attack and the noise, I had to go for a compromise as I don't own studio-quality microphones.
Radio
Futaba FF6 super manual and some
info on different types.
A very good but swedish pdf version of the manual is available
here, apparently someone there has
the original files.
Technical info about the
RF design can be found on the
futaba site
Manuals for the Futaba Field Force 8 super (FF8s) manual, both 3.3Mb pdf files.
Available are a
German, with a separate
attachment,
and a much more elaborate English version. The last one
is a corrected version of the manual on the futaba site.
I have also info on the factory service menu
IMPORTANT NOTE for FF8 users: the slot where your battery is connected into gives no clue whether the connector is plugged in appropriately. It needs substantially more force than standard servo connectors, and if not pushed on the interior connector appropriately the connector may pop off or make an unreliable contact. In case of doubt open the transmitter and check how much force you have to apply directly using the good view you then have on the connector.
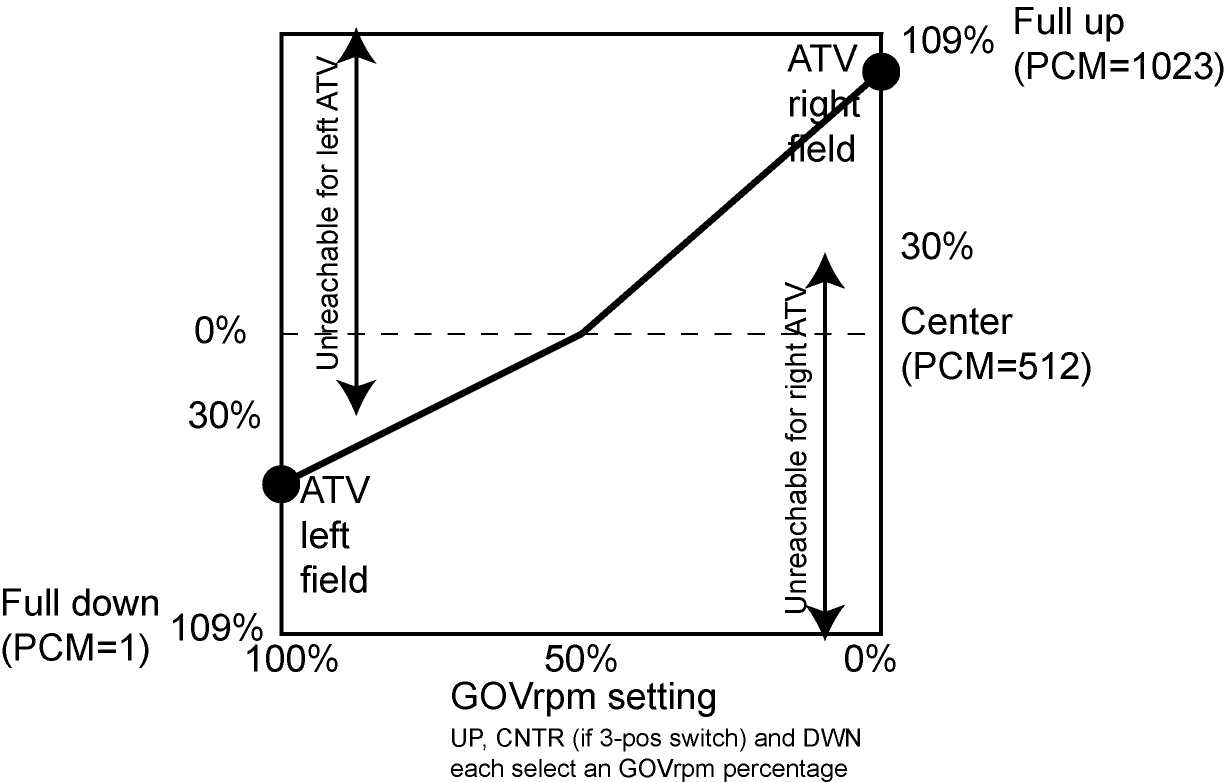
I figured out the governor percentage-to-value conversions.
Although there are only two points on the curve that can be set up (the left and
right ATV value), the governor menu can best be thought of as a three point curve, with a fixed
midpoint at zero (PCM value 512) in the center.
 Furthermore it shows that
an ATV of 109% corresponds to full servo deflection. Higher values dont give more throw.
switch "up" means away from the sticks, and "down"
towards the sticks.
The figure shows what happens. I put 100% on the left, because the 100% govrpm
setting corresponds with the LEFT ATV field.
Recently I did measurements of the total latency of the radio system.
The report of my findings is
here.
On my publication page is also a reconstruction of the Futaba PCM1024Z radio format.
Servos
I gathered some info about the servo power usage.
Also I found an analog/digital comparison sheet
from Futaba.
I have been using a variety of servos over the years and I can give a bit of comment on them.
I have been using exclusively Futaba servos and they are very reliable servos.
I started with 9202 for aileron elevator and pitch, 3001 for throttle and 9250 for the Robbe 3D gyro.
This is a robust configuration but a bit slow on the cyclic.
I then got a CSM560 gyro with 9253 servo. I moved the 9250 to the pitch, kept the 9202 on the aileron and elevator,
and throttle with 9202. This was a dramatic improvement in pitch control.
Then I decided to upgrade the other cyclic servos as well.
I put 9254 on aileron elevator and also on the tail.
9250 still on pitch, 9253 went to the throttle.
Engine
The OS-Max 32 SHX engine. Claimed 1.2 HP at 18000rpm.
Hatori 333 tuned pipe for use with OS32. Some additional technical info: all aluminium. Length 190mm, diameter 35mm, entrance diameter approx 15mm, exit diameter approx 13mm. I chose the Hatori 333 pipe because I heard it doing a good job on the OS32 in the raptor of Jasper Steffens. Another club member heard my pipe/OS combination and immediately decided also to buy a Hatori 333! A year later, people still remark on the low noise levels, especially at idle.
The 333 package contains most you need to attach the pipe to the OS32: a piece of silicon pipe to attach the pipe to the manifold, two metal clamps (hatori #111=#113) to attach the silicon pipe, and material to hang the pipe to the raptor chassis.
You also need a "header" (bended pipe=manifold) between the engine and pipe. You need the #334 (Header for shuttle/OS32). This combination fits perfectly with the available holes in the frame, and you can reach the idle needle normally (which is not the case with manifold hatori#341, see here). The drawbacks are that you have to cut away a small part of the canopy, and that the header is of aluminium: as far as I know all alu pipes crack within some 100 flights, but I think I have a solution for this.
I also attached a 45° silicone 'exhaust deflector' to the other end of the
pipe, to get the exhaust fumes away from my raptor.
See here for a detailed overview of the
hatori mufflers.
The OS-Max 50 SX-H ring engine. Claimed 1.8HP at 17000RPM.
Hatori 540 tuned pipe, for combination with OS50 and similar.
Exact package contents are in the manual. Some additional technical info:
all aluminium. Length 266 mm, diameter 40 mm, entrance diameter 18 mm, exit diameter 12 mm.
You need a 10 mm exhaust deflector. The 35 mm of silicone tube that comes with the pipe has
an inner diameter of 15 mm. You need the Hatori #541 front header to attach the stuff on your
raptor, info on this is also on the sheet. The package also contains a separate piece of paper with
mounting instructions.
Note that I currently use the stock 50 muffler, due to continuing engine problems.
I'm not sure right now how good the OS50/Hatori 540 combination is,
but the stock muffler with 10% nitro performs good even without governor.
vario headertank
The fuel filter
Gyros
CSM 560 gyro manual. Layout as the real paper version, with some
improvements. (other versions on the internet have a sloppy layout).
Robbe 3D gyro page
1-2,
10-11,
12-13,
14-15,
16-17
This is a nice gyro with which you can fly backwards and sideways at high speeds without problems. Slow pirouettes are a bit step-wise though.
And with fast pirouettes, control gets sluggish, as if the gyro has released control and is just rotating fast.
Battery stuff
Currently I use two types of batteries: the conventional, cylindrical
Nickel Cadmium (NiCd) and Nickel Metal Hydride (NiMH) batteries for
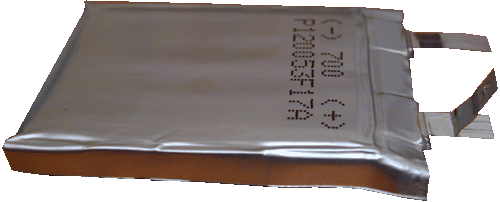
the stuff on the ground, and a Lithium Polymer pack for the helicopter.
Click on the images to get more info on one of these types.


|
Conventional batteries (click image)
|
Lithium Polymer batteries (click image)
|
battery chargers
The Robbe 6 battery charger, page 1,2. Still in use, it has no fan so very silent, and great for over-night charging. Furthermore, much lighter and smaller than the simprop with power supply.

The Simprop Intelli-Control battery charger (in German) and some
REMARKS. This charger is also available as FMA Super Nova 250s. This diagram
from
flyingsites.co.uk nicely shows the menu layout.
The AFX-2792 6-8A Power supply (for powering the Simprop charger).
The same power supply is sold under different names, but with the same external box (see photo at right).
Apache SMART LiPo charger. I have the 1215 charger.
I adopted this from an internet version of the manual, as the paper version
I received with the charger apparently was for an older version.
Miscellaneous
The remote glowplug connector (dont buy this! see tips)
Graupner Voltspy
English,French,
German
You can find other useful manuals on the sites of
Michael Prewitt,
Net Express and Ty Hoeffler.
© W.Pasman, 8/6/3
 Furthermore it shows that
an ATV of 109% corresponds to full servo deflection. Higher values dont give more throw.
switch "up" means away from the sticks, and "down"
towards the sticks.

