Photoshop Alpha layers
Photoshop 4 (Macintosh) has a number of difficult issues and near-impossibilities when dealing with alpha layers.
Furthermore it sometimes behaves very surprising. Especially working with straight RGBA images
is less trivial than should be. I have seen a lot of pages on photoshop
transparency but none explains really what's going on.
Here I try to bring some light on the issues.
I know it, this is a very old version of Photoshop, but actually it runs very reliably,
it starts up very fast, it runs under my preferred OS8.6 (Waaay faster than OSX),
it can do anything I need to with bitmaps (well, almost),
and I have a lot of nice plugins that maybe
are not even available for the latest Photoshop edition.
Transparency layers
Photoshop seems to use two kinds of transparency layers. One of them
seems impossible to make visible, and I will call it the invisible transparency or IT layer.
The other is the layer mask, which is visible as an additional channel.
However, there is a way to copy the IT layer into a layer mask. This goes as follows:
1. select 'show layers' from the Window menu
2. command-click the layer that you want to get the IT layer from
3. click on the 'add layer mask' icon
(the icon with a white circle on a gray square in the bottom of the layer window)
Now you have added a new channel, which appears as a layer mask thumbnail that
is chained to the original image.
If you now switch to the channels by selecting the windows/show channels menu,
you can view the layer mask separately by turning off the other channels.
You can now also copy this layer mask.
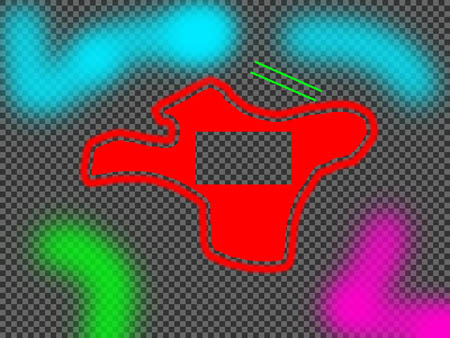
You can try this with the photoshop image on the right
(click on the image to get the photoshop file)
that I will use to illustrate other things as well.
Two layers?
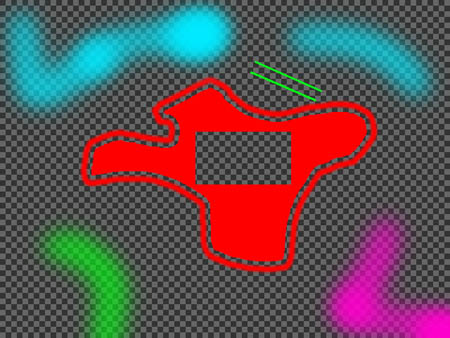 At first you might think that you now have the same image but with a decoupled, editable
transparency layer... wrong! What you probably did not notice is that your image
changed slightly when we added the layer mask. See the result on the right.
The difference is especially clear in the transparent green blob.
At first you might think that you now have the same image but with a decoupled, editable
transparency layer... wrong! What you probably did not notice is that your image
changed slightly when we added the layer mask. See the result on the right.
The difference is especially clear in the transparent green blob.
At this stage we can proof that there are now two transparency layers,
one of which is still invisible.
Just select the layer mask and make it all white... you will be back to the original
image (instead of having removed all transparency if this were the only transparency layer)!
What we have is an image with two transparency layers. As the layer mask
is a copy of the original transparency layer, everything has become twice as transparent
as it was before adding the mask!
Now you might think, easy just turn off the layer mask... surprise, it is off already!
You can better see what 'turning on' means when you turn all other channels off.
Then, you can see that 'on' means that the layer mask is shown as a gray value image.
Turning it on together with other channels will cause the gray values to be
blent with the RGB image. In what way, confusing ?!
Third, don't make the mistake to think you 'copy' the layer mask by command-clicking
the layer and then selecting 'copy' from the edit menu. Instead this will just copy the entire
image including the IT layer, which will be converted into a greyscale image if
you paste it into a channel or grayscale picture. Of course this will have only
accidental similarity with the transparency layer.
Fourth, if you want to copy something into a layer mask channel, you have to make the channel
visible first. If you don't, the clipboard will be pasted into anything but the layer mask
channel! This is different from the other channels, where pasting does not do anything
(without warning) when the channel is not visible...
Finally, note that only layers with an IT layer can get a layer mask.
But that's most layers, only the first layer - the background - can be without IT mask
if it is an RGB image without transparency.
Removing the IT layer
 So how does the original image look like without the IT layer?
Maybe a little surprising, approximately as the picture on the right.
Approximately, because areas that are completely transparent have been replaced with white here.
If you don't believe it, you can check the original using the eyedropper tool.
The color picker does not work if you click in a fully transparent area,
but it works as soon as you enter even the lightest shade of a painted area.
So how does the original image look like without the IT layer?
Maybe a little surprising, approximately as the picture on the right.
Approximately, because areas that are completely transparent have been replaced with white here.
If you don't believe it, you can check the original using the eyedropper tool.
The color picker does not work if you click in a fully transparent area,
but it works as soon as you enter even the lightest shade of a painted area.
Interesting are the dithered borders of the brush, that were invisible before because
the border is almost fully transparent..
Also notice the interesting area where the cyan hits the red. A thin, very dark
border has appeared there. When you use the airbrush, photoshop seems to try to use
the IT channel to do the fading out of the color.
But when it hits an already painted area this
does not work and photoshop reverts to straight blending into RGB space.
You can see these effects better by checking the full-size photoshop file (click on the image).
So how did I remove the IT layer? In fact, I always used a bug in the rendering system of
photoshop to do it. Go to the File/Preferences/Transparency & Gamut menu and
select 'use video alpha'. Now my machine, a powerbook G3, should have hardware supported
alpha but apparently something goes wrong, causing the image to appear without alpha!
Now I just grab the image from the screen using the finder key command-shift-3 and
opening the grabbed image in photoshop.
I just discovered another way to get it: paste the transparent image
on top of itself 100 times! Select (a copy of) the transparent image in photoshop,
press command-a command-c and then 100 times command-v. Well actually it's better to
flatten the image after 10 command-v keystrokes. Each time the transparency will decrease a little,
and after 100 times it is pretty opaque even in the highly transparent areas. Of course this can be
done quicker than just pasting 100 times (find out yourself!).
Reading RGBA images
With this knowledge, we solve an often recurring problem: reading in
and showing RGBA images in photoshop.
Actually the procedure is straightforward.
Make sure you have an uncompressed image, for instance uncompressed TIF,
TARGA or SGI. Open the file as raw, using 4 channels.
You can determine the header length of your image by calculating how much bytes
you expect and how much there are actually in the file. Usually the extra bytes are
header, but you find out quick enough if the image appears moved to the left or right
in photoshop.
The image will appear as CMYK image (...). Now use the knowledge described in the
previous sections to copy the 4 channels into an RGBA image, as follows:
(1) copy the image size by selecting the CMYK image and pressing command-c
(2) create a new image of the right size by pressing command-n. Select RGB Color mode,
and select 'background color'. Do not yet create a new layer, as photoshop apparently can
copy only channels to the background layer (why??).
(3) Copy the C, M and Y channels one by one from the CMYK image to the RGB image,
(4) Copy the RGB image onto itself in a new layer, by selecting the RGB image
and pressing command-a command-c command-v. This is needed because we can't add
a layer mask to the background image.
(5) Click on the add layer mask button to add the transparency layer to the RGB image.
(6) Turn on visibility of the layer mask channel. This is necessary to enable
copying into the layer (why??)
(7) copy the K channel from the CMYK image to the layer mask channel in the RGB image.
(8) turn off the layer mask visibility.
(9) Delete the background layer holding a copy of your image (but without transparency) to
see your transparent image in full glory!
Note. During copying of the CMYK to RGB image the colors will change slightly on the screen.
In fact you could expect very large changes as the cyan color is copied into the R channel,
yellow into blue, etc,
but Photoshop uses the inverse intensities for CMYK and RGB images to more or less correct
for these effects. That is, 100% cyan is 0% intensity on the C channel while 100% red is
100% intensity on the R channel, etc.
Saving RGBA images
Using similar techniques we can save an RGBA image.
If the transparency layer is implicit we have to make it explicit, by using a layer mask
and by removing the IT layer as we discussed above.
Then we proceed as follows:
(1) make a CMYK image of the same size: select the RGB image,
type command-a command-c command-n
(2) Select CMYK color and background color.
(3) Copy and paste each of the channels from the RGB image to the CMY layers, and
the layer mask to the K channel.
(4) Finally you can save the CMYK image as RAW to a file "xxx.rgba".
Note 1: if the (transparent) RGB layers
do not cover the entire area, the copy action will select only the actual pixels,
not the transparent border. If you paste this into the CMYK image this partial copy
will be centered, and thus in most cases it will be displaced! However the K layer
will be copied entirely. You may temporary add a dots in bottom left and top right
corners of the RGB image to avoid this problem.
Note 2: The file seems to get somewhat bigger than expected,
but that is because photoshop adds some resources to the
file as well and these are included in the file size...
© W.Pasman, 8/12/2