Tail rotor
With the Raptor V1 I had lots of problems with the tail rotor, and had to open it several times.
Best use relatively large Philips screw driver to (un)screw the HMJ2-10N self-tapping
screws in the tail pitch housing! I demolished two screws by using a small driver that
seemed to be the appropriate size at first glance, but
which will flip out of your screws all the time. It seems you cannot get these screws
separately.
I'm happy that they replaced this weak part on the V2 by hexnut bolts and locnuts,
this is the best improvement next to the larger trust bearings!

| These MHJ2-10N screws are very small, and furthermore when magnified they look like pozidrive heads. |
Removing all play from the tail rotor system is essential to get a rock steady tail in all circumstances. There are two types of tail play: rotational (variable pitch) and in/out play. Translational play can also cause rotational play, but rotational play alone will not induce translational play, so check translational play first.
In the end, the most problematic is 'rotational play': the pitch of the tail
rotor can vary a little although you fixate the rod.
This part of the play came
from play between the selftapping screw and the collar in the tail pulley flange,
and on the raptor V2 there was also sideways play on the tail rotor axis
(see my page on removing play to resolve both).
These solutions resolved rotational play on the blades.
In/out play is when a blade holder can move a few mm in and out.
On the Raptor V1 the problem can come from the ballbearings being not tightly squeezed.
Although these bearings seem to fit good around the set screws, they still can rotate quite a lot
around (any) axis perpendicular to the set screw, causing in/out play of the blades and blade holders, often also
inducing a rotational play as well.
On the V1, only squeezing them quite tight with the lock nut does resolve this - then there
is no place for such a rotation, although this seems not very good for ball bearings...
With the Raptor V2, the fit of the bearings is better, but still a similar play can develop.
On both V1 and V2, the tightness seems to decrease over time.
This is caused by the bearing inner scale digging into the locknut. Replace these locnuts if you see
a circular wear appearing at the inside of the locnut where the bearing hits it.
On the V1,
additional problems are caused by the set screw coming out slowly, even with loctite.
Only with very thorough degreasing and very good tightening the loctite will hold. One time
I even used CA to glue the set screw and loc nuts in place...
On the V2, there are less issues with loosening screws. There is one other issue: the flange where the
tail blade holder bearings are mounted on can be slightly too long. This causes translational play.
This is easily solved by sanding the flanges a bit shorter.
But before you start doing this mod, try new locknuts. The bearings dig themselves into these nuts,
causing play as well.
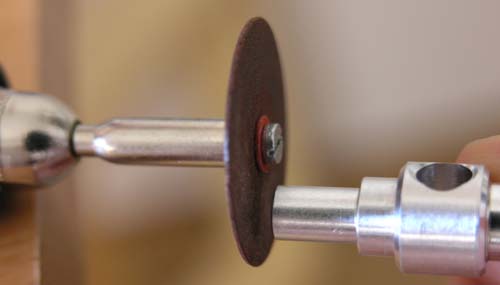
| Shortening the flanges (V2). |
© W.Pasman, 27/10/03 updated 24/8/05