Opening the Engine
The procedure to dismount and remount the engine is as follows. On this page
you see the OS 32 engine, but the OS50 is very similar.
I give comments on the OS50 differences where appropriate.
You need a towel (to hold the hot engine), a piece of wood, a paint stripper heat gun
(optional but very handy) and an electric cooking plate. And of course some
hex screw drivers.
Opening
First remove the hex screws on top and back,
and remove the rear cover and cylinder head. Be careful with the gaskets.


|
The rear cover
|
The crankshaft becomes visible
|
|
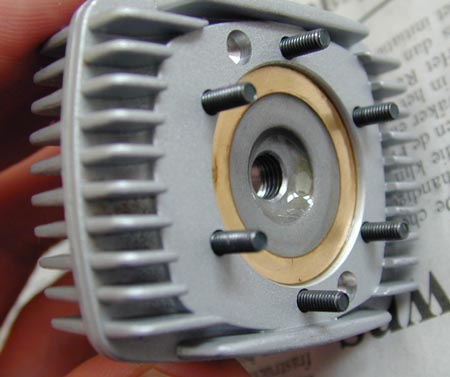
back face of the OS32 cylinder head. Note that the left side is
slightly wider than the right side. The OS50 head is symmetric.
|
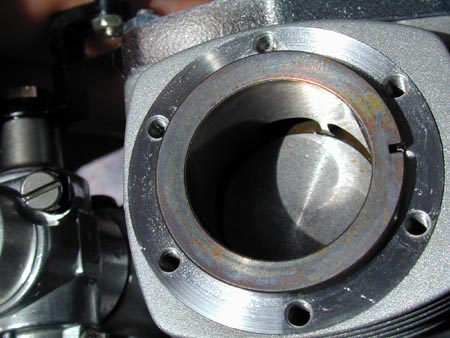
Looking into the cylinder we see the piston and the liner set.
Note the alignment notch on the right.
|
Now you can see the liner set. You most probably have to heat the engine
slightly to remove this (say to 50 ° C). Do this by aiming
a paint burner to the cylinder casing for 5 to 10 seconds,
maybe you want to remove the carburetor
first to prevent it getting too hot accidentally.
It is also possible to use an electric cooking plate to heat it,
the shop man said it is even better than a paint burner.
The working temperature of the
engine is at about 200 degrees celcius
(according to
rc-racing.com), so removing the carburetor is
not essential if you dont aim the burner at the carburetor.
Once warm you can pull out the liner set (better not use metal tools, to avoid
scratches).
The second time I opened my engine the liner set was very hard to remove.
The shop man helped again. First he tried to get a stanleyknife under the liner,
without heating at all, but that did not work.
I don't know how he opened it (he went to the back of the shop), but considering
the small pits that appeared in my housing he must have driven something with a sharp point
under the liner set... it showed that there was carbon burned between the
liner set and housing. Probably my engine has been running too hot
(glow plug inspection indicated that it might have been slightly hot).
With my OS50 I dont even have to heat the head, it slides out by just pushing
the bottom of the liner up through the rear hole.
When remounting note the small
extrusion on the cylinder head to align the liner set.
Once the liner set has been removed, the connecting rod and cylinder can shift
towards the back, just enough to get the connecting rod off the crankshaft
if you rotate the cylinder to its highest position. There may be some cooked oil
on the wrist pen, making it difficult for the rod to go backwards completely.
Slide it forward and backward until it comes off the crankshaft.
This can take some time, I usually have to slide it back and forth over 100 times,
and it easily takes 15 minutes or more...
Be careful to shift the connecting rod, not to bend it.
If necessary, push the connecting rod from behind, close to the cylinder.
Also, chech that the crank stays down while you try to get the rod off,
sometimes it comes out a bit, and then the rod won't come off the crank ;-)
Once the rod is off the crankshaft, you can get it out of the cylinder.
With the OS32 you can remove the wrist pen if necessary - just push it out, it is not
fastened in any way. The OS50 has small springs keeping the pen in place and it may
be harder to get it out.
With my OS50 I now can push out the crankshaft out of the bearings. My OS32 is
tighter, it can be pushed out only after heating up the engine a bit.
To remove the front bearing, you have to heat up the engine to higher temperature, maybe
150° C = 1 minute with the paint stripper/heat gun,
or some 5 to 10 minutes on an electric cooking plate.
With my OS32 shop man did this without removing the carburetor
(I could never get it loose anyway). With the OS50 you should remove the
carb at this stage, which is easy. Unscrew the wedge, and push it loose at both sides
- it probably pressed itself into the plastic heat insulator around the carb.
Then you should be able to rotate the carb a bit, and wiggle it out.
Dont forget to pick the black spacer ring out of the hole.
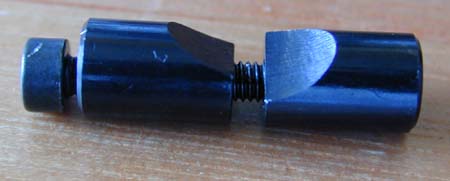
Carb wedge of OS50.
Leave the plastic (teflon) heat separator in the engine if you cant
get it out, in the worst case it will shrink a bit and come loose during heating.
The bearings can have a good deal of heat as well. Some oil may evaporate from them,
but they receive fresh oil from the engine fuel while running.
Keep a piece of wood at hand, to tick out the bearing once hot.
Then gently tick the engine on the wood, the bearing should fall out by itself.
If you got out the crankshaft you can put the engine on a stick, so that the engine
hangs on the front bearing. Do NOT use the crankshaft for this!!
To get out the rear bearing, heat it up further. The OS32 doesn't need much more heat,
but my OS50 is much tighter here,
probably 200° C = an additional 3 or so minutes on a red glowing cooking plate.
For the OS50 rear bearing a paint stripper is insufficient!
Be careful when heating up above 150, oil will start to carbonize and
parts may get stuck in carbon. One time I had done that, and I needed to heated it to 275° C
in my oven to get the part still out.
Be careful with inserting the new bearing: the bearings are officially
only OK up to 125° C so dont heat them up too far or too long. If you heat them above
200 they will discolor and may be damaged.

|
Heating up the engine further, to get out the rear bearing.
Here you can see the proper orientation of that bearing: the open side
towards the rear cover. Strange is that in my OS50 the shop man put in the closed side
to the rear. So probably it doesn't really matter.
|
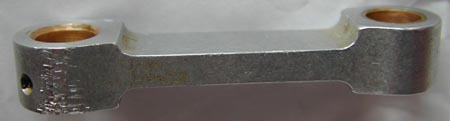
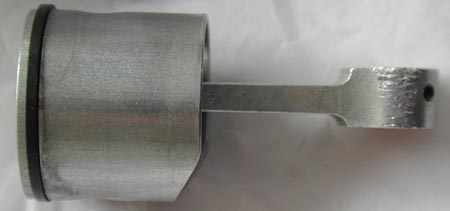
The connecting rod of the OS32 is assymetric. In this photo the right side goes into the cylinder,
the left side around the crankshaft. The rear cover comes at the bottom side of the image,
so the connecting rod is slanting slightly away from the rear cover.
|
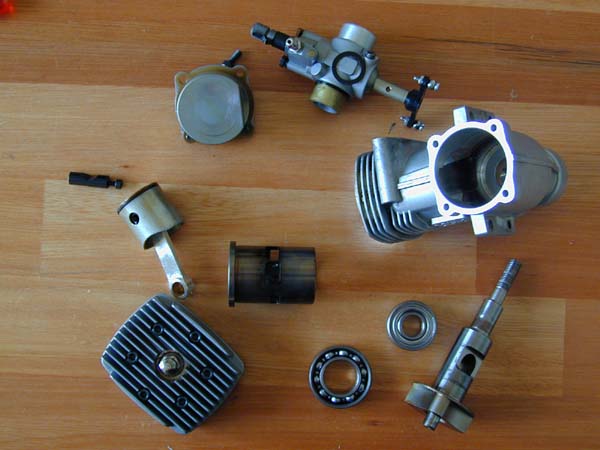
If you reached it up to here, your desk looks like this now.
New bearings waiting to be put in!
Re-mounting
To get the stuff in again, less heat is required because now you can heat the housing without
heating the components. Heating the block 150°C should suffice as the bearings according to the spec sheets
can't stand more than 125°C without damaging (I assume that the block will quickly drop
down to 125C after getting it out of the oven).
First heat up the large bearing separately and slide it over the crankshaft.
Note that with my OS50 the bearing will slide over even without heating.
For OS32 I learned that the open side of the bearing facing the rear cover (see photo).
But for the OS50 the shopman put the nearly-closed side to the rear.
Nearly-closed, because this bearing is open at both sides, but the teflon
ring (or whatever plastic it is) that keeps the balls in their place makes one side
look nearly-closed.
Then heat up the block, and slide in the front bearing and crankcase with the rear bearing.
Do NOT hammer the new bearings in, that may damage them!
When putting the cylinder back, consider a few alignment issues.
First, the piston has a bend carved out at the bottom side, this side is to give
way to the crankshaft.
Second, the connecting rod is assymetric (so that it will bend in case of a blocking
engine, instead of breaking something else). It is slightly slanted away from the
rear cover, see the photo. On my OS50 this assymetry was not so obvious, I'm not sure about
that. Sand the rod lightly with polishing paper if there are some
scratches (as mine has, due to the tools we used).
Third, the wrist pen has one side with a plastic side and one without.
The one without should fit into the ring, as in the figure.
Combined, there is only one
way to fit the piston, wrist pen and connecting rod.
Finally, note that the piston ring has an alignment notch.
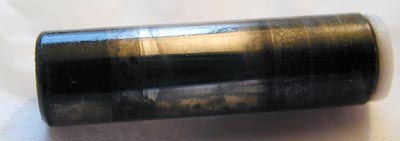

|
The proper orientation for the wrist pen of OS32. Note
the plastic button on the right side. (only translation required
to put it in). In OS50 you usually leave the wrist pen in place as it is locked in place with
a c-clip.
|
Note the alignment notch for the piston ring.
|
When completely assembled, the piston looks like this:
When closing the back plate,
don't put loctite in the screws, just close them firmly, not extremely tight.
The local dealer told me that these screws attach because they are different
metals. Even some oil on the screws is no problem.
Also note that one side of the cylinder head is smaller than the other (the cylinder
is 'off-center'),
the smaller side should be at the side of the carburetor to make space for some
screw there. With the OS50 the head seems symmetrical.
Getting the heat insulator on (OS50)
If you could not get the teflon heat insulator ring out before heating up the engine,
big chance that it shrunk due to the heat.
If it shrunk, you wont be able to get the carb in again.
To get the heat insulator ring around the carb, heat the ring up a few seconds with the heat gun.
This will soften the ring, after which it can be pressed around the carb.
Oil
After the engine has mounted fully, put some after-run oil in it. The compression
will be very low now. This is normal, because the oil in the fuel is much thicker than
after-run oil. After the first run the compression will be normal again.
© W.Pasman, 22/4/3