Clutch liner
A new clutch with pre-installed liner does NOT give a correct spacing.
As mentioned on several web sites, the correct initial spacing between liner and clutch
is 0.1mm. With this spacing, the clutch will drag a little when the engine
idles, but after a few starts the clutch will wear in and the dragging disappears.
All clutches I bought so far came with about double the right clearing, and also the fit is very poor (see pictures)!.
If you use that, the clutch shoes usually bend out beyond repair in just a few flights.
The good news is that the gap is too large, which makes it easier to correct for than when the gap would be too small.
What I never encountered is the full procedure for measuring and installing the liner. So here it comes.
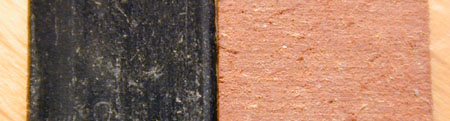
The standard liner is black like shoes-sole rubber, 1.1mm thick, 119mm long and 10mm wide. Robbe has another liner, Robbe No.S 4464, "43mm" (I dont see what is 43mm?). This liner is 142mm long, 12mm wide and 1.2mm thick. Color is brown, looks like light brown flexible leather. I thought the standard liner to be too thin, so I decided to try the Robbe liner (which showed too thin as well, see below).
I recommend to at least check the spacing when you install new clutch shoes,
and replace both liner and shoes when in doubt.
Old clutch shoes will have bent out quite some distance, growing along as the old
liner grew thinner. The brown Robbe liner seems to wear more than the black rubber stuff.
Installation goes in three steps:
(1) measure layer thicknesses to glue in.
(2) cut liner to length
(3) glue in the liner and additional spacers.
(4) sand lightly to get proper spacing
Accurately determine how much spacing there is and how you want to
fill this in order to get a spacing of 0.1mm at all sides.
Following measures are from my last clutch, probably you want to check some values.
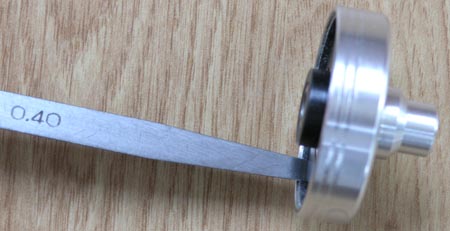
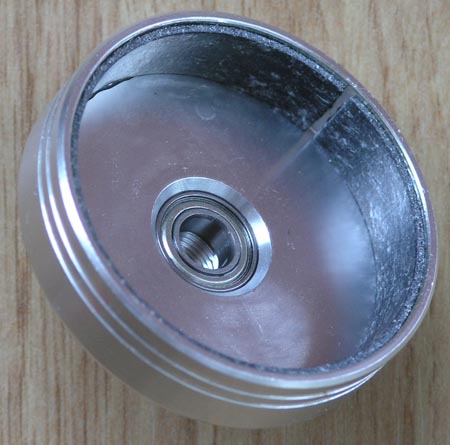
Without liner, I found a spacing of 2.8mm between bell and (new) clutch.
(The clutch is 36mm diameter and the bell about 38.8, but to measure the
spacing accurately put the clutch in the bell and measure the gap).
So I have a gap of 1.4mm at each side, and I want a spacing of 0.1mm
leaving 1.3mm to fill. The Robbe liner showed to be 1.2mm, so I had
0.1mm remaining to be filled.
I don't recommend to fill this with glue,
expecially not epoxy, as I expect that epoxy will be pressed out slowly during use.
I decided to fill this 0.1mm with paper. I took some standard paper, put 8 layers on
top of each other and found the pile to be 0.7mm so very close to 0.1mm per layer.
So I decided to make a sandwich consisting of one layer of paper under the liner.
A more recent raptor V2 clutch required two layers of paper.
To make sure the spacing will be 0.1mm, I put cellotape around the clutch. 10 layers of
cellotape showed to be 0.4mm so 1 layer is 0.04mm. I put in two layers
(start and stop the cellotape layer above a shoe gap, to avoid bumps).
This is very simple: put in all layers into the clutch bell as planned, but without glue.
Cut the liner exactly to length. If you are not sure about the exact length
or work a little sloppy, cut it one millimeter longer and check how it fits.
The liner should fit extremely tight: you should have to
really press it in so that it keeps itself in place already.
Other layers of course also should fit nicely, otherwise you may get
a bump in your liner.
Put two long M3 bolts through the clutch (in order to be able to get the clutch out later),
and test whether the whole stuff fits in snugly.
You can use standard epoxy, temperature-hardening epoxy or JB weld.
I have used 5 minute epoxy and 30 minute epoxy with great success.
Be aware that standard epoxy gets soft when it is heated up a lot,
so check the liner after a crash or if you accidentally start up with full throttle.
With normal use and even with fast spinups your clutch will never get very hot anyway.
Many people highly recommend JB weld, I have never used it
but if you want to try, you can get it in the Netherlands from
here.
I think I saw the stuff also at Praxis or Gamma in 2005.
However JB weld is very difficult to get out, and on RR I saw a lot of people
having trouble replacing a JB-welded liner.
With standard epoxy, you can easily remove an old liner:
just heat it up in 10 minutes to 150 degrees Celsius and lift out the liner by pushing something under it.
With 200 °C it will even fall out without any pushing,
but officially bearings should not be heated that hot
and the grease might also bake badly at 200°C so recently I keep it at 150°C.
Remember to regrease the bearing after baking it.
Use very thin layers of glue on the clutch bell and put in the layers
you planned to put in. Make sure there is glue everywhere under the layers.
Dont put glue directly on the liner:
especially the Robbe liner will suck in the glue, which will reduce the
liner effectiveness.
Make sure each layer goes completely to the bottom of the clutch.
When all layers are sandwiched in, wipe out excess glue from the bottom of the clutch bell.
Be careful not to smear it onto the new liner.
Press in the clutch
(again including M3 bolts to get it out again!)
so that everything is
pressed into its final position. Leave the whole package drying.
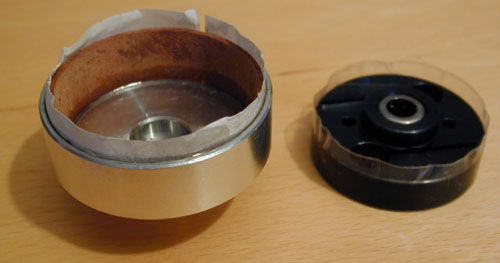
Get out the clutch, and remove the cellotape. Cut the sandwich (in my case, the paper layer) to length. The clutch will fit very tight into the newly-lined bell. To get the right spacing of 0.1mm, we sand the liner lightly with fine sanding paper. (the cellotape made up for 0.08mm). This is easy, as the surface of new liner is quite soft.
© W.Pasman, 22/5/02. Last update 24/7/05