
System requirements
In order to install the 3MR program on your system, your computer must, at least, adhere to the following requirements:- A 32 or 64 bit version of Windows XP, Windows Vista, Windows 7 or Windows 8
- Windows Internet Explorer 6 or newer
- A processor with a clock speed of at least 1 GHz
- 512 of internal memory (RAM)
- 2 GB of free hard disk space
- A graphics card with support for OpenGL
- Adobe Flash ActiveX Plug-in
Overview Startscreen
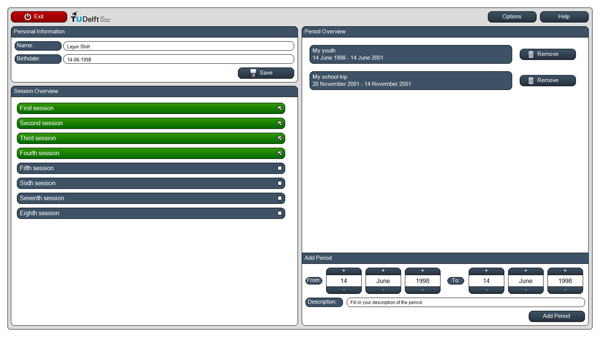
You start the 3MR program via the shortcut 3MR on your desktop or by opening the Start menu and clicking on 3MR and 3MR. As soon as the application has started, you will be asked where to save the data. If you must visit your therapist to discuss the information entered in the 3MR program, choose Choose where to save and open data so you can save the data to a removable device, such as a USB device. After you've selected where to save and open the data, you will see the Startscreen (see figure). This screen consists of the following sections:- (1) Personal Information: in this section you can fill in your name (not mandatory) and your birth date. You can click on the date to open the Date Picker and select a date. Click on Save to save the entered data.
- (2) Session Overview: in this section it is possible to track your progress. You can keep track which sections you have already completed via the therapy guide. Once you have completed a session, it is possible to tick the box next to each session button.
- (3) Period Overview: in this section you will find your added periods. Once you have added a period, it will appear immediately in this section. If you click on a period, you will visit it and enter the Diary screen.
- (4) Add Period: in this section it is possible to add periods. First, you must add begin and end dates, add a description of the therapy and click on the button Add Period. The period will then appear in the Period Overview.
Back to the table of contents
Overview Diary Screen
The Diary Screen consists of a number of sections:- (1) The Time Line: on this Time Line you will see the current period, highlighted with the white arrow, and your other periods. Please note that it is impossible to switch between periods via the Time Line. To achieve this, you must use the Date Picker.
- (2) The Date Picker: below the Time Line you will find the Date Picker. You can change the day, month and year to browse through periods.
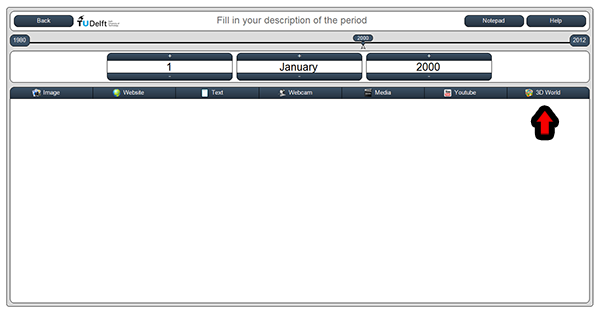
- (3) the Diary: in the Diary you will find all your added media, such as images, websites, maps and more.
The Diary
Adding an image
To add an image to the diary, proceed with the following steps:- In the Diary, click on the button Image
- Choose the image you wish to add from your PC. You can add JPG, PNG, GIF and BMP files.
- Once you have chosen the image it will appear automatically in the Diary.
Back to the table of contents
Adding a website or a map
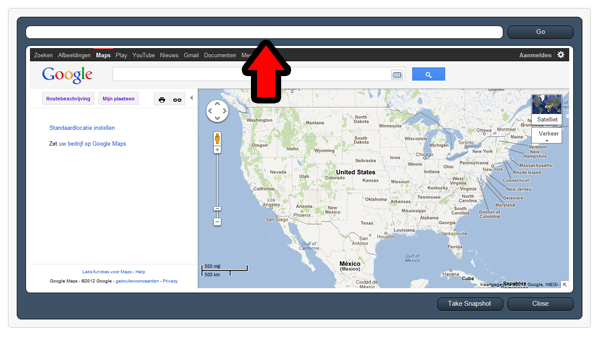
To add a picture of a website or a map to the Diary, proceed with the following steps:- In the Diary, click on the button Website
- A new browser window will open. To add a map, type in Google Maps the location you wish the add to the Diary. It is possible to use Street View. To add a website, type in the address bar (see figure) the address of the website you wish to add.
- Once you can see the website, click in the right bottom on the button Take Snapshot. A picture of the website will automatically be added to the Diary.
Back to the table of contents
Adding text
To add text to the Diary, proceed with the following steps:- In the Diary, click on the button Text
- A new, empty text area will be added to the Diary. Click on Edit at the bottom of this text area.
- A new window will open. In this window you can type your text.
- Once you are done, you can click the button Save to save the text.
Adding a YouTube video
To add a YouTube video to the Diary, proceed with the following steps:- In the Diary, click on the button YouTube
- A new window will open. In the text field at the top of the screen, enter your search term.
- Click on the button Go to perform the search for YouTube videos.
- The results of the search will appear in the Search Results area. Every thumbnail is a result.
- Click on a thumbnail to watch the video. The video will appear on the right side of the screen in the area marked Video.
- If you are satisfied with the video, click Add Video at the bottom of the screen to add the video to the current day in the Diary screen
Users of Windows 8 already have the Flash plug-in installed, as it is part of that operating system.
Back to the table of contents
Edit text
To change text, proceed with the following steps:- In the Diary, choose the text area you wish to edit.
- Click on the button Edit at the bottom of the text area.
- A new window will open. In this window you can edit the text.
- Once you are done typing, click on the button Save to save the changes.
Adding a webcam picture
To add a webcam picture, you must have a working webcam with properly installed drivers. Consult the manual from your PC manufacturer if you have a built-in webcam or the manual from your webcam manufacturer.- In the Diary, click on the button Webcam
- A new window will open. If the webcam is properly installed, a live feed of the webcam will be displayed on the screen.
- Click on Take Snapshot once you are ready to take a picture. The picture will be automatically added to the Diary.
Deleting an image, text, YouTube video, a webcam picture, map or website
To remove media, proceed with the following steps:- In the Diary, choose the media you wish to remove by clicking on it.
- Click on Delete at the bottom of the area of the media.
- The media will be deleted.
Starting the 3D environment
To start the 3D environment, proceed with the following steps:- In the Diary, click on the button 3D World
- A new window will open
- In the text field on the bottom, typ a name for the 3D World you wish to create
- Click Add World
- The 3D world will open automatically
Back to the table of contents
The Notepad
The Notepad is meant for writing down thoughts and adding content without attaching it to a specific day. You can open the Notepad from the Diary by clicking in the top right on the button Notepad.Adding text
To add a note, proceed with the following steps:- In the Diary, click on the top right on the button Notepad to open the Notepad.
- Click on Text at the top of the screen that just appeared.
- A new text area will appear. Click Edit to open the text editor where you can type your text.
- Once you are done, click the button Save to save the note
Adding other content
To add other content, proceed with the following steps:- In the Diary, click on the top right on the button Notepad to open the Notepad.
- Click on Image, Website, Text, Webcam, Media or YouTube at the top of the screen that just appeared.
- The items will automatically appear on the Notepad.
- Once you are done, click the button Close to close the Notepad.
Moving an item to a specific day
To move a note to a specific day in the Diary, proceed with the following steps:- In the Diary, go to the day you wish to place the content.
- Click in the top right corner on the button Notepad
- Drag the content to the area Drag to copy to diary! until it disappears.
- The content will be transferred to the current day in the Diary.
Back to the table of contents
Removing an item
To remove an item, proceed with the following steps:- In the Diary, click in the top right corner on the button Notepad
- Click on the button Remove below the content you wish to remove.
- The content has been removed.
Closing 3MR
To close the 3MR program, proceed with the following steps:- If the 3D world is currently active, close the 3D world by clicking on the cross in the top right corner.
- If the Diary is currently active, click on the button Back in the top left corner to return to the Startscreen.
- Click on the red button Shutdown in the top left corner of the Startscreen.
Language select
To change the language of the 3MR program, proceed with the following steps:- In the Startscreen, click on Options.
- A new window will open. Click on the drop-down menu to see all installed languages.
- Choose the desired language and click on the button Save.
- The 3MR program will restart automatically to apply the new setting.
Exporting data
It may be possible that your therapist asks you to export the user data of the 3MR program. Exporting the data can help for a better understanding of the use of the 3MR program. You can export data only after completing and ticking the box next to all therapy sessions.In order to export the data, proceed with the following steps:
- Click on the button Export in the top right corner of the Startscreen.
- A new window will open. You can choose between an abstract or a detailed export. In the abstract export only statistics will appear, while in the detailed export besides the statistics also your typed text and a screenshot will be added to the export.
- Choose the folder in which you want to save the exported data.
- Click on Export to export the data.
Back to the table of contents
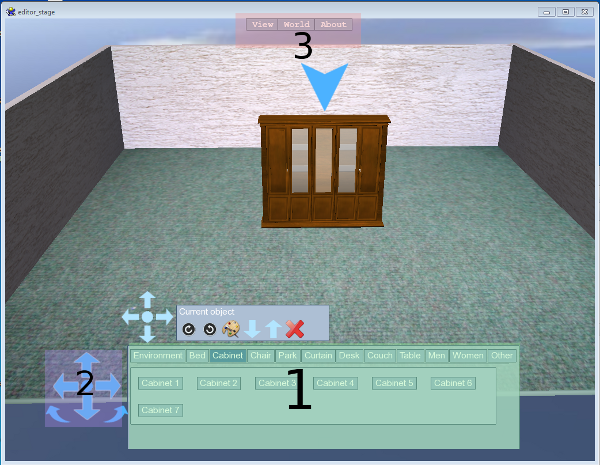
Overview 3D World
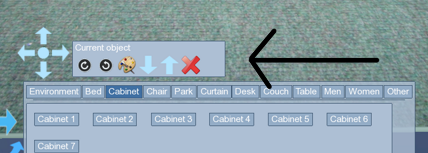
You can start the 3D World by clicking on the button 3D World from the Diary (see figure). Directly afterwards the 3D World will start and you will see the 3D World. In this screen, there are three major sections (see figure):- (1) The Object Library: at the bottom of the screen you will find a menu with which you can add objects and persons to the 3D World. This menu is split up in several tabs and subtabs to keep it conveniently arranged.
- (2) Left of the Object Library you will find four arrows with a circle in the middle. With these four arrows it is possible to fly through the 3D World in the directions in which the arrows are pointing. With the circle in the middle you will restore the view of the 3D World.
- (3) At the top center of the screen you will find the menu bar of the 3D World in which you will find the following options: View, World, About. More about these options later on.
Back to the table of contents
Adding an object
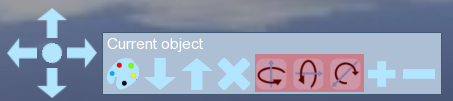
To add an object to the 3D world, click on one of the object names from the Object Library. Once you have clicked, the object will appear in the center of the 3D World an a specific menu will appear, the so called Object Menu (see figure):- (1) with the four arrows and the circle it is possible to change to position of the object. The circle will reset the object to the default position.
- (2) with the following two buttons it is possible to rotate objects: with the left button you will rotate the object left, with the right button right.
- (3) with the following button you can change the colour of the object. Please note the object will only slightly change of the colour.
- (4) with the following two buttons you can move objects up or down.
- (5) with the red X it is possible to delete the current object.
- (6) the following button will appear only if you add a person. With this button you can lay a person down.
Back to the table of contents
Moving an object
In order to move an object, you can use the four arrows next to the Object menu as well as the arrow keys on your keyboard. The arrow keys on your keyboard move the object significantly faster then the arrows next to the Object menu.Back to the table of contents
Deleting an object
In order to remove an object, you must first select it. You can select an object by clicking on it. You can check whether the correct object has been selected by looking at the Selection Arrow. In case there are too many objects in the surrounding environment, you can check whether you have selected the correct object by moving it.Once you have confirmed that the correct object has been selected, click on the red cross in the Object Menu or press the Delete button on your keyboard.
Back to the table of contents
Rotating an object
In order to rotate an object, you must first select it. You can select an object by clicking on it. You can check whether the correct object has been selected by looking at the Selection Arrow. In case there are too many objects in the surrounding environment, you can check whether you have selected the correct object by moving it.Once you have confirmed that the correct object has been selected, click on one of the three Rotate buttons (see figure: the red surrounded buttons) in the Object Menu to rotate the object.
Back to the table of contents
Resizing an object
In order to resize an object, you must first select it. You can select an object by clicking on it. You can check whether the correct object has been selected by looking at the Selection Arrow. In case there are too many objects in the surrounding environment, you can check whether you have selected the correct object by moving it.Once you have confirmed that the correct object has been selected, click on + or - button in the Object menu to respectively enlarge or reduce the size of the object.
Back to the table of contents
Colour an object
In order to remove an object, you must first select it. You can select an object by clicking on it. You can check whether the correct object has been selected by looking at the Selection Arrow. In case there are too many objects in the surrounding environment, you can check whether you have selected the correct object by moving it.Once you have confirmed that the correct object has been selected, click on the pallete button in the Object menu to open the colour dialog. Choose a color and apply it to immediately see the result. If you wish to reset the colour of the object, click the reset button, which is the dot in the center of the four arrows of the Object menu.
Back to the table of contents
Flying through the 3D World
You can fly through the 3D world by using the four large arrows next to the Object Library. Besides the four arrows it is also possible to use your mouse to fly through the world or the keyboard, with the keys W A S D.To zoom in in the 3D world, you can use your mouse's scroll wheel.
Back to the table of contents
Adjusting the mouse speed
If you often use your mouse to fly through the 3D world, it might be handy to adjust the mouse speed to your preferences. You can do this by proceeding with the following steps:- Click on the button View in the menu bar.
- Click on the item Adjusting Mouse speed
- Move the just appeared slider. The further the slider, the higher the mouse speed.
- The changes will be applied immediately. Try to move your mouse during the setting to try out the new settings before definitely applying them.
- Click on the button Close to close the window Adjusting Mouse speed.
Switch between day/night in 3MR
It is possible to switch in the 3D world between day and night:- Click on the button View in the menu bar.
- Click on the item Day/night.
- Move the just appeared slider. The further the slider, the darker the scene.
- The changes will be applied immediately.
- Click on the button Close to close the window.
Loading default environments
The 3D World offers the ability to load default environments. You can choose from the following environments:- Park
- Church
- Living room
- Click on the button World in the menu bar
- Click on the environment you wish to load
- The 3D World will ask whether you wish to overwrite your current 3D World. Choose Yes to overwrite the current loaded world.
Making a screenshot
To make a screenshot of the 3D World or a specific scene in the 3D World, you can proceed with the following steps:- Click on the button View in the menu bar
- Click on the item Make screenshot
- The 3D World will report the screenshot has been successfully saved and has been automatically added to the current day of the Diary.
Lights on/off
It is possible to simulate night and day in the 3D World. You can simulate night and day by proceeding with the following steps:- Click on the button View in the menu bar
- Click on the option Lights on/off. The light setting will be switched from day to night or the other way around.
Adding a custom object, image, billboard or video
If you have a picture or video you wish to add to the 3D world, you can add it by proceeding with the following steps:- Click on the View button in the 3D World
- Choose:
- Load picture if you wish to add a flat image
- Load billboard if you wish to add an image that always rotates with your view
- Load video for adding a video
- The image or video is loaded
- Go to the installation folder of the 3MR program.
For 32 bit systems this path is normally: C:\Program Files\TU Delft\3MR System
For 64 bit systems this path is normally: C:\Program Files (x86)\TU Delft\3MR System - Enter the folder Editor and then the folder Models.
- Create a new folder called Custom.
- Place your own model in the by you just created folder.
Back to the table of contents
Closing 3D World
In order to close the 3D world, press the ESC button on your keyboard. The changes will be saved automatically.Terug naar de inhoudsopgave
Information for translators
In case you want to translate the 3MR program to your own langauge, please keep in mind the following things:- There are two files: an xml file and a file with no extension. The encoding of these files is UTF--8. Also, you should translate the Help folder en place these files in, for example Dutch, the folder Help_Nederlands.
Terminologie
Object Library
the Object Library is the menu with tabs from which you can add all objects
the Object Library is the menu with tabs from which you can add all objects
Current Object Arrow
this blue arrow is displayed when selecting an object
this blue arrow is displayed when selecting an object
Recovery Button
the Recovery Button is in the center of the four arrows and resets the object to the default position in the 3D World
the Recovery Button is in the center of the four arrows and resets the object to the default position in the 3D World
Diary
the Diary Screen is the screen you see when you click from the Start Screen on a period
the Diary Screen is the screen you see when you click from the Start Screen on a period
Startscreen
the Start Screen is the first screen you see when you start the 3MR program
the Start Screen is the first screen you see when you start the 3MR program
Notepad
the Notepad is meant to write down thoughts you do not want to attach to a specific day
the Notepad is meant to write down thoughts you do not want to attach to a specific day
Time Line
the Time Line is positioned at the top of the Diary Screen and is used to display the current period
the Time Line is positioned at the top of the Diary Screen and is used to display the current period
Date Chooser
The Date Chooser is used to pick the date of the Diary and is positioned below the Time Line
The Date Chooser is used to pick the date of the Diary and is positioned below the Time Line
Back to the table of contents